Several users have reported that they are unable to check their emails using the Mail app on their iPhone. This article explains how you can troubleshoot if you see the “cannot verify server identity” error message. This is a common problem. You may experience this issue when you are trying to check your mail on your iPhone 18 Pro or iPhone 18 Pro Max. It appears that this problem affects both IMAP and POP users. IMAP and POP are two methods to access email from any device.
The error message says:
“Cannot Verify Server Identity. The identity of “mail.example.com” cannot be verified by Mail.”
How to fix
It is important to follow these instructions in order. Test the Mail app between steps to see if the issue is resolved.
As the error message indicates, there may be some security certificate (SSL) issues with your e-mail provider’s mail server. Another possibility is that your email provider may have made system changes recently and this change is causing this problem.
1. Check with your email service provider (Gmail, Hotmail, Yahoo, AOL, or your Exchange / IT admin) to see if there’s a service outage. Furthermore, check with your service provider to find out if you are using the correct settings.
2. Make sure that the iPhone 18 Pro is connected to the Internet over Wi-Fi or cellular. You may want to check your Internet connection easily. Open Safari on your device and try to visit a website.
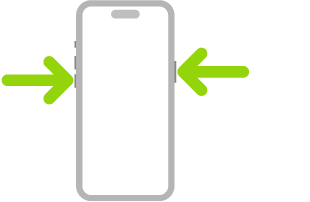
3. Restart your iPhone 18 Pro. Here is how:
- Press and hold the side button and the volume up (or down) button together until the power off slider appears. Then drag the onscreen slider. Wait until your device completely shuts down. Then press and hold the side button until you see the Apple logo.
4. Make sure that your iPhone 18 Pro is running the latest version of iOS. Here is how you can check and update your device:
- On your device, go to Settings > General > Software Update.
- If there is an update available, tap Update Now and then follow the onscreen instructions.
5. Disable the “Use SSL” option. This may fix your problem if you are still having the problem. Here is how:
- Tap Settings.
- Apps > Mail > Mail Accounts.
- Under the Accounts section, tap the email account that is giving you this problem.
- Tap Account Settings.
- Tap Advanced.
- Under the “Incoming Settings” section, disable Use SSL.
- Then exit Settings, and restart the Mail app and test again if this issue occurs again.
6. Delete and add your account again. Please note that deleting your account may remove previously downloaded emails. You may want to log in to the email provider’s website if your email provider offers web-based service. If you see all the emails there, then your mails will be redownloaded again when you re-add the account.
Doing so may fix your problem as your current settings may not be correct and corrupt. Here is how:
- On your iPhone 18 Pro, tap Settings > Apps > Mail > Mail Accounts.
- Tap the email account that is problematic (that we will delete).
- Tap Delete Account.
Now your account is deleted, let’s add your account again. There are two ways to add an email account:
- Automatic.
- Manual.
What you can do is to try the automatic option first since it is easier and then test your problem if you are still having the problem, and then delete the account and add your account again manually.
Here is how you can add automatically:
- On your device, tap Settings > Apps > Mail > Mail Accounts.
- Tap Add Account.
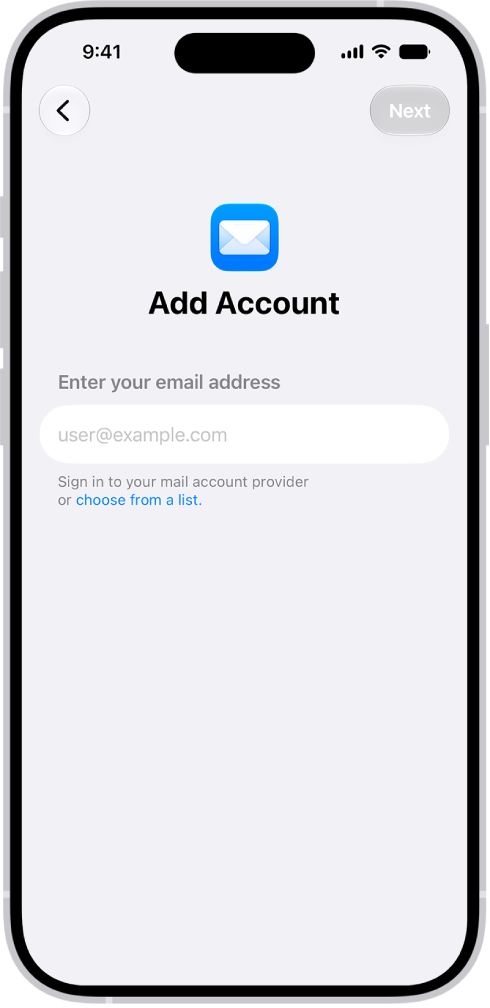
- Tap “choose from a list.”
- Tap your email account (iCloud, Microsoft Exchange, Google, Yahoo, AOL, Outlook, etc).
- Then follow the onscreen instructions.
And here is how you can add your email account manually:
- Tap Settings > Apps > Mail > Mail Accounts.
- Tap Add Account.
- Tap “choose from a list.”
- Tap Add Other Account.
- Tap Mail Account.
- And follow the onscreen instructions. Make sure that you enter the email account details correctly. If you are not sure about the details, again you may want to contact your email service provider.