


In this article, we explain how you can change the font size on your Mac with Tahoe to make it easier to read text on your display. You can easily decrease or increase text size on your Mac in just a few steps. There are a few different methods to do this. For example, if you only want to change the font size in the menu bar, there is a way to do this.
You can also make the pointer bigger.
System Settings
You can easily change the size of text and objects. On your Mac, follow these steps:
- Click the Apple menu.
- Click System Settings.
- Click Displays in the sidebar (you may need to scroll down).
- Select a resolution:
- If you see a thumbnail view of the available resolutions, move the pointer over the thumbnails to see the resolution sizes, then click the one you want.
- To see the available resolutions as a list, hold down the Control key and click the thumbnail view, then choose Show List.
- To unlock additional scaled resolution options for more granular control, hold down the Option key and click a resolution thumbnail to reveal options for "More Space" (smaller text/icons) or "Larger Text" (bigger text/icons).
- You can make everything larger (text, objects, or menu items) by clicking on one of the options to the left of Default (for larger display) or smaller by clicking one of the options to the right of Default (for more screen space).
If you are using an external display, you can change settings for each display individually.
Accessibility
You can use your Mac’s accessibility features to adjust text size across multiple apps and system elements. You can make text and menu bar items larger. Here is how:
System-wide Text Size
- Click the Apple menu.
- Click System Settings.
- Click Accessibility in the sidebar (you may need to scroll down).
- Click Display.
- Scroll down to the Text section and click "Text size."
- Drag the slider to the right to increase the text size on the desktop, in app sidebars, and in compatible apps.
Menu Bar Font Size
- Click the Apple menu.
- Click System Settings.
- Click Accessibility in the sidebar (you may need to scroll down).
- Click Display.
- Scroll down to the Text section and look for "Menu bar size."
- Choose either Default or Large.
- Exit System Settings.
A system notification may appear saying "Changes to menu bar font size require a logout to take effect." If prompted, click the notification to log out and then log back in. Your menu bar text will now be larger.
Text Size in Specific Apps
You can increase the text size in different apps. Here is how:
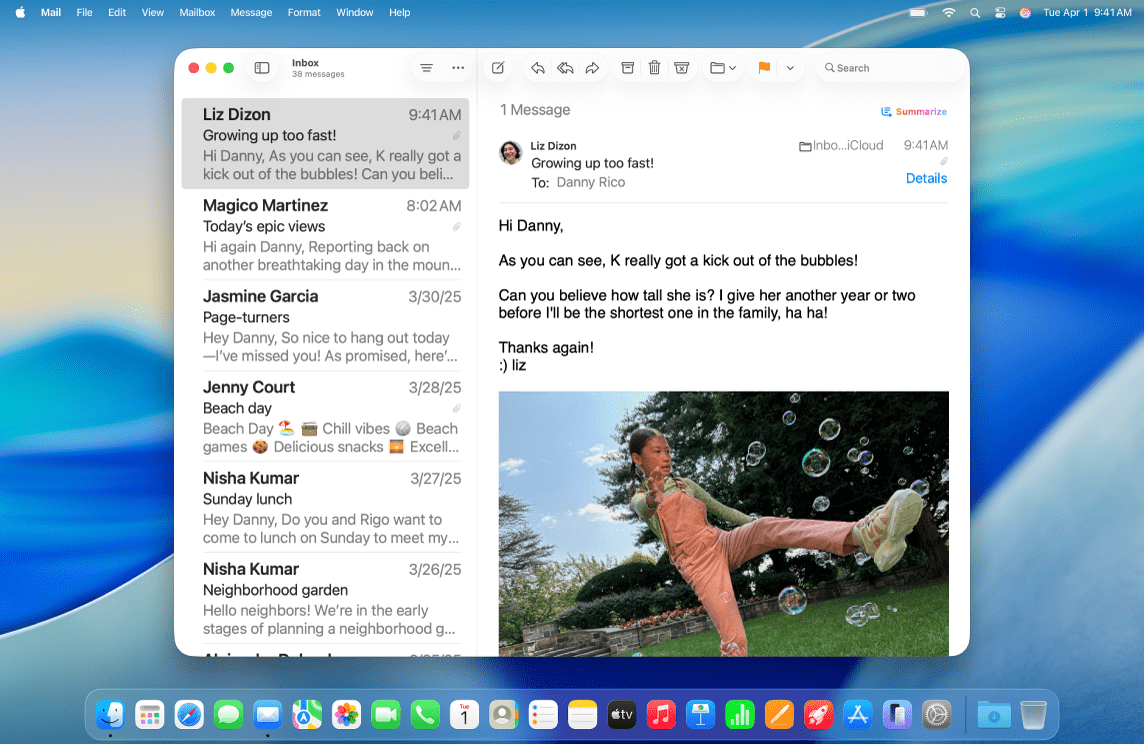
Mail Text Size
In Mail, go to Mail > Settings and click the Fonts & Colors tab. Click the Select button next to "Message font" to open the Fonts window. You can change the font size and type to your preference.
Messages Text Size
In Messages, go to Messages > Settings > General. Then adjust the "Text size" slider by dragging it to the right to make message text bigger. Alternatively, you can use the keyboard shortcuts Command-Plus to increase text size or Command-Minus to decrease text size while in a conversation.
Safari Text Size
There are two options to choose from:
Option 1: Make the text larger for specific websites
In Safari, visit the website you want to adjust. Use Command-Plus to zoom in or Command-Minus to zoom out. To reset the zoom, press Command-0 (zero) to return to actual size. Safari will remember your zoom setting for that website and apply it automatically when you visit it again.
Option 2: Make the text larger for all websites
In Safari, go to Safari > Settings > Websites tab. Click "Page Zoom" in the sidebar. On this screen, you can see your zoom settings. Click the dropdown menu next to "When visiting other websites" and select a larger percentage to apply the zoom level to all websites by default.
Bonus: Text-only zoom
If you prefer to zoom only the text and not images, hold Option-Command and press Plus or Minus.
Other Apps
Most other apps support the "zoom" feature. In the app, you can press Command-Plus to zoom in or Command-Minus to zoom out to change the view. If this does not work, open the app settings and look for text size options. For example, in Google Chrome, you can go to Chrome > Settings > Appearance, and then you can change the font size by selecting the option from the "Font size" dropdown menu.
Hover Text
There is a convenient macOS accessibility feature called "Hover Text" that magnifies text when you move your pointer over it. Here is how you can turn this on:
On your Mac, open System Settings, click Accessibility in the sidebar. Then click Hover Text (you may need to scroll down). Toggle "Hover Text" on.
By default, you can hold the Command key and move your pointer over text to display a large, magnified version of it in a separate window. You can customize the appearance and behavior of Hover Text by clicking the info button next to "Hover Text" to adjust:
- The magnification level
- Font size and style
- The activation modifier key (you can change from Command to another key if preferred)
- Activation lock (triple-press the modifier key to keep Hover Text active without holding it)


