The iPhone comes with a number of ringtones you can use, but it’s your iPhone, why not use a custom ringtone for specific contacts? That way, when a certain someone calls you, you can immediately know who it is. For example, you can set a song that’s special to you and your spouse, so when your spouse calls, you’ll hear the song and know immediately who it is.
There are different ways to create iPhone ringtones. In this post, we will show you how to make a custom ringtone right on your iPhone with GarageBand or using your Mac.
How to Make and Install Ringtones From Songs on Your Mac
First things first, you cannot create a ringtone using Apple Music songs as they are DRM-protected. So, to create a ringtone, you must have a music file that’s not protected. You can get free tones and songs from a number of websites on the internet.
How to Make a Ringtone From a Song in Apple Music
- Open the Music app.
- Go to your music library and find the song you want to make into a ringtone. Play the song and keep an eye on the elapsed time at the top of the app. Note the time stamp where you want the ringtone to start, then note where you want it to end. (Note: Ringtones cannot be longer than 30 seconds.)
- Once you have the start and end times noted for the clip, right-click the song and pick Get Info.
- A window with the details of the song file will appear. Select the Options tab in the pop-up window.
- In Options, there are timecodes for Start and Stop. Check the Start checkbox and enter the starting time from step 2. Then check the Stop box and enter the end time. Click OK.
- Select the clip, and from the top menu bar, click File > Convert > Create AAC Version. (If the only option you see is Create MP3 version, select it.)
- A new copy of your song file will appear under the original. Right-click on it and select Show in Finder.
- A Finder window with the song file should appear on your desktop. Look at the file’s extension (the extension appears after the file name after a “.”). If you don’t see the extension, right-click on the file, select Get Info, and then look for the Name & Extension section. Then do one of the following:
- If the extension is .m4a, change it to .m4r.
- If the extension is .mp3, the file needs to be converted to .m4a. Open the file in QuickTime Player, which is in your Applications folder. Then in QuickTime Player, click on the File menu and select Export As > Audio Only. Name the file, choose a place to save it, then click Save. Then change the extension of the newly exported file to .m4r.
Now your ringtone file is ready for your iPhone. Below are the steps to install it.
How to Load the Ringtone From the Mac to Your iPhone
- Connect your iOS device to your Mac as you normally would with a USB-C or Lightning cable.
- Open a Finder window (press Command-N).
- In the sidebar under Locations, you should find your iPhone. Select it.
- Find your ringtone file (the one with the .m4r extension), and drag it over to the Finder window that has your iPhone selected.
- A green “ ” icon should appear on your cursor and the file that you are dragging. That means you will be adding it to your iPhone. Drop the file to install it.
And that’s it! To see the ringtone, open the Settings app on your iPhone, then tap Sound & Haptics > Ringtone, and it will appear at the top of the list with other custom ringtones (if you have others).
You can now click the eject icon in the Finder sidebar to disconnect your iPhone from your Mac.
How to Make a Ringtone With GarageBand for iPhone
Using the free GarageBand app by Apple, you can take a song or voice recording on your iPhone, turn it into a ringtone, and set it as your iPhone’s incoming call or text tone. The steps below show you how to do that.
Before You Edit in GarageBand, Here’s How to Prep for the File You Want to Edit
- If you have an existing sound file, copy it to iCloud Drive.
- If you want to edit a song, you must have the song file, either by buying it online or ripping it from a CD. If you have the actual song file already on your iPhone, you will be able to access it through GarageBand.
- Copy-protected song files cannot be edited.
- Streamed Apple Music songs or songs from another streaming service cannot be used as ringtones.
How to Make Custom Ringtones on Your iPhone
If you don’t have or want to use your Mac, you can create a custom ringtone right on your phone with a little work. You can import a pre-recorded song—again, it needs to be an unprotected track that you own—or create something original using GarageBand’s instruments. Here’s how to convert any song as a ringtone on iPhone without a computer:
- Open GarageBand. If you don’t have GarageBand on your iPhone, download it from the App Store. It’s a big application, so give it some time to download.
- When GarageBand opens, tap the Tracks button at the top of the screen.
- Swipe through the screen left or right until you find the Audio Recorder section. Tap it.
- At the top left of the screen, tap the Tracks button. It’s the third button from the left.
- Tap the Loop Browser on the upper right. It’s the button with a loop icon.
- A file browser window opens, and you can choose the track you want to use for a ringtone.
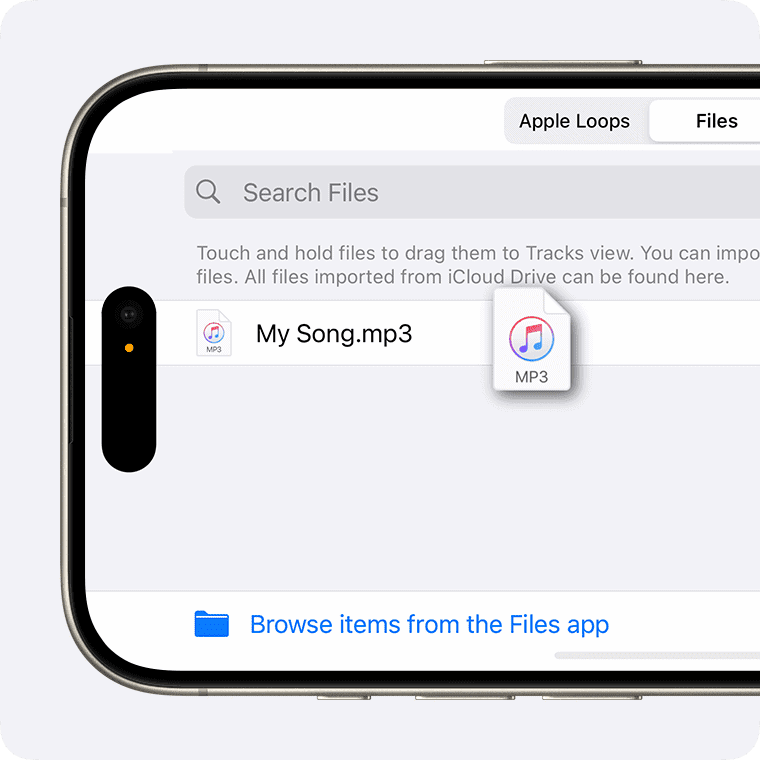
- To use an audio file stored on your device or in iCloud, tap Files, then tap Browse items from the Files app.
- To use a song from your Apple Music library, tap Music to find the file. The song must be downloaded to your iPhone. If the file is dimmed, it’s protected or isn’t downloaded to your iPhone. If the file is protected, you can’t use it for a ringtone.
- Touch and hold the file, then drag the file all the way to the left in the Tracks view.
- Now it’s time to edit the track down to 30 seconds:
- If you want a visual cue to help you with the time, tap the Settings button and turn on Time Ruler. This will display the time in seconds at the top of the workspace.
- Tap the Play button at the top to hear the song. Tap it again or tap the Stop button next to it to stop playing.
- To trim a song, tap the track, and trim bars will appear at the ends. Tap and drag a bar to the stop where you want to trim the song.
- While we’re not going into greater detail here, you can perform other edits if you want. You can cut sections out, add effects, etc.
- Once you’ve edited the song, you can save it as a ringtone:
- Tap the Navigation button in the upper left. It’s the arrowhead pointing downward.
- In the pop-up menu, select My Songs. A window called GarageBand Recents will open, and your saved GarageBand Project will display as My Song.
- In the browser, tap the More button, tap Select, then select the song you just created.
- Tap the Share button, then tap Ringtone.
- Enter a name for the ringtone, then tap Export.
- If the ringtone is longer than 30 seconds, tap Continue to have GarageBand shorten the ringtone automatically.
- Or tap Cancel to return to the song so you can shorten it.
- When the ringtone has finished exporting, tap "Use sound as", then choose an option:
- To replace the current general ringtone, tap Standard Ringtone.
- To replace the existing general text tone, tap Standard Text Tone.
- To associate a ringtone with one of your contacts, tap "Assign to contact," then choose a contact.
- To return to the My Songs browser without assigning the ringtone, tap Done.
How to Buy Ringtones From Apple
Apple sells ringtones that you can buy directly on your iPhone. Here’s how to shop for ringtones:
- Go to the iTunes Store app on your iPhone. If you can’t find the iTunes Store, do a search on your iPhone or tell Siri, “Launch the iTunes Store.” You can also get to the iTunes Store through the Settings app by tapping Sound & Haptics > Ringtone > Tone Store.
- Tap More, then tap Tones.
- Browse by category or tap Search to find a specific song or artist.
- Tap a tone to see more information or play a preview.
- To buy a tone, tap the price.
When you buy a ringtone, you’ll be given options to set it immediately. The ringtone will be available in the iPhone settings, and you can always adjust it to your liking.