Several users have reported that they received the “iTunes could not connect to iPhone or iPad because an invalid response was received from the device” error message when they connect their iPhone to their computers. Furthermore, some other users have stated that iTunes freezes while they are syncing their iPhone with their computer.
This error occurs when the USB communication to your iPhone 18 Pro is broken.
I experienced this problem also. I have recently purchased an iPhone 18 Pro. After connecting it to my computer, I received this error.
With iTunes you can:
- sync your content (movies, apps etc)
- move (add or remove) the content from your computer to your iPhone
- update or restore your iPhone
iTunes cannot connect error fixes
- Try a different USB cable
- Try a different USB port
- If possible, try a different computer
- Close iTunes and reopen and try again
- Restart your computer
- Restart your iPhone 18 Pro
- Restart your router
- Make sure that your device is unlocked when it is connected
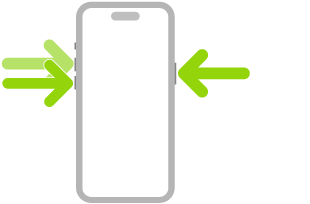
- Force restart your device. Press and quickly release the volume up button. Press and quickly release the volume down button. Press and hold the side button. When the Apple logo appears, release the side button.
- Update iTunes:
- Windows: Menu > Help > Check for Updates
- Update your computer:
- macOS: To check for available updates, choose Apple menu > System Settings, click General in the sidebar, then click Software Update.
- Windows: Make sure that you have all updates downloaded and installed.
- Update your iPhone 18 Pro. Make sure that you have the latest version of iOS software installed. You can do so wirelessly by going to Settings > General > Software Update
- Reinstall iTunes
- On your iPhone, try resetting your network settings by going to Settings > General > Transfer or Reset iPhone > Reset > Reset Network Settings (note that this will remove your Wi-Fi passwords etc).
- A third party security program may be causing this. Because it may prevent iTunes from communicating to Apple servers. Update your security software. If possible, try disabling it temporarily.
- For Windows, reset TCP/IP.
- On your iPhone, go to Settings > General > Date & Time and turn on “Set Time Automatically”
- On your Mac (if you are using a Mac), make sure that time and date settings are set correctly (System Settings). If you are using a PC, also make sure that time and date settings are set correctly.