


Usually, you set up your iCloud account while going through the initial setup routine for your iPhone. You can set up other email accounts as explained here.
To set up an email account on your iPhone, you need to know the email address, the password, and the email provider. You may also need to know the addresses of the mail servers the account uses. For Microsoft Exchange, including Microsoft 365, you may need the domain name as well; check with the system’s administrator to find out. Alternatively, you can set up your Exchange account using a configuration profile file that the administrator provides.
Add an Email Account on iPhone
- On your iPhone, open the Settings app.
- At the bottom of the Settings screen, tap Apps.
The Apps screen appears. - Tap Mail.
The Mail screen appears. - Tap Mail Accounts.
The Mail Accounts screen appears. - Tap Add Account.
The Add Account screen appears. - Tap your email provider (such as Google, Outlook, or Yahoo). If your provider isn’t listed, tap Other.
- Enter your email address.
- Tap Next.
-
Note: From this point on, the account setup procedure varies depending on the account type. This example uses a Microsoft Outlook email account.
An information screen appears. - Tap Next.
A dialog prompts you to choose between signing in to your account via Microsoft and configuring the account manually. - Tap Sign In.
-
Note: If another security screen appears, such as a two-factor authentication or 2-Step Verification screen, enter the required information and tap Next.
The configuration screen for the account appears. - Make sure the Mail switch is set to On.
- Set the Contacts, Calendars, Notes, and any other switches to On or Off, as needed.
- Tap Save.
The account appears on the Mail Accounts screen.
Note: If you have not yet set up an email account on the iPhone, you can also display the Add Account screen by tapping Mail on the Home screen.
Note: For Microsoft Exchange or Microsoft 365, you can use the iPhone’s Mail app, but you might also want to try Microsoft’s Outlook mail app, which integrates tightly with these services.
Configure Mail Display and Default Account Settings
In your iPhone’s Mail app, you can choose how many lines to include in message previews, decide whether to display the To and Cc labels, and control whether Mail prompts you before deleting a message. You can enable Privacy Protection; choose whether to mark email addresses outside a particular domain, such as that of your company or organization; and specify the default account that Mail uses to send messages when you start creating a message from another app. For example, if you open the Photos app and share a photo via Mail, Mail uses your default account.
- On your iPhone, open the Settings app.
- At the bottom of the Settings screen, tap Apps to display the Apps screen.
- Tap Mail to display the Mail screen.
- If the Summarize Message Previews switch appears, set it to On to have Apple Intelligence generate summary previews that give the gist of each message rather than its first few words.
- Set the Show Contact Photos switch to On to display contact avatars next to messages.
- Set Show To/Cc Labels to On or Off, as needed.
- Tap Preview, then select the number of preview lines to display (from None to 5 Lines). Tap ‹ Mail to return to the previous screen.
- Tap Swipe Options.
- Tap Swipe Left, then select the action you want to occur when you swipe left on a message: None, Mark as Read, Flag, or Move Message. Tap ‹ Swipe Options to return.
- Tap Swipe Right, then select the action you want to occur when you swipe right on a message: None, Mark as Read, Flag, Move Message, or Archive. Tap ‹ Swipe Options to return.
- Tap ‹ Mail to return to the Mail screen.
- Set Ask Before Deleting to On or Off, as needed.
- Tap Privacy Protection, then make sure Protect Mail Activity is set to On. Tap ‹ Mail to return.
- Set Follow Up Suggestions to On or Off to control whether Mail follows up with you about time-specific commitments you make in emails.
- Tap Mark Addresses, enter the domain name of your company or organization (such as geekschalk.com), then tap ‹ Mail to return.
- Tap Default Account to display the Default Account screen.
- Tap the account you want to use as the default account.
- Tap Mail to return to the Mail screen.
- Tap Undo Send Delay; tap Off, 10 Seconds, 20 Seconds, or 30 Seconds to set the delay before actually sending a message when you tap Send.
Enable Mail Privacy on iPhone
If you upgrade your iCloud account with an iCloud+ subscription, you can use two privacy features that help reduce your exposure to online threats. Private Relay hides your iPhone’s IP address and your browsing activity, helping prevent networks and websites from building a detailed profile of you or determining your exact location. Hide My Email enables you to create unique, random email addresses that forward to your real email address, so you can keep your personal address private when signing up for apps, websites, or newsletters.[1][2]
Turn On Private Relay
- On your iPhone, open the Settings app.
The Settings screen appears. - Tap your Apple Account at the top (the button that shows your name and Apple ID).
The Apple Account screen appears. - Tap iCloud.
The iCloud screen appears. - In the iCloud+ Features section, tap Private Relay.
The Private Relay screen appears. - Set the Private Relay switch to On.
- Tap IP Address Location.
The IP Address Location screen appears. - Tap Maintain general location or Use country and time zone.
- Tap ‹ Private Relay.
The Private Relay screen appears again. - Tap ‹ iCloud.
The iCloud+ screen appears again.
Use Hide My Email
- Tap Hide My Email.
The Hide My Email screen appears. - Tap Create New Address.
A Hide My Email panel opens and a new random email address appears. - You can tap Use Different Address to generate a different random address.
- Tap Label Your Address.
- Type a descriptive name for the address.
- Optionally, tap Make a Note and type a note.
- Tap Continue.
The All Set screen appears. - Tap Done.
The Hide My Email screen appears again, now including the new address.[1]
Organize and Read Your Email by Threads
The Mail app on your iPhone gives you two ways to view email messages. You can view the messages as a simple list, or you can view them with related messages organized into threads, which are sometimes called conversations.[3]
Having Mail display your messages as threads can help you navigate your inbox quickly and find related messages easily. Threading is especially useful if you tend to have long email conversations, because it reduces the number of messages you see at once.
Set iPhone Mail to Organize Your Messages by Thread
- On your iPhone, open the Settings app.
- At the bottom of the Settings screen, tap Apps to display the Apps screen.
- Tap Mail to display the Mail screen.
- In the Threading section, set Organize by Thread to On.
- Set Collapse Read Messages to On to save space by collapsing messages you have read.
- Set Most Recent Message on Top to On to make the newest message in each thread appear at the top of the conversation.
- Set Complete Threads to On to have each thread show all its messages, even if you have moved some messages to other mailboxes.
- Tap Muted Thread Action, then tap Mark as Read, Archive, or Delete to specify what Mail should do with muted threads. Tap ‹ Mail to return.
Read Messages Organized into Threads
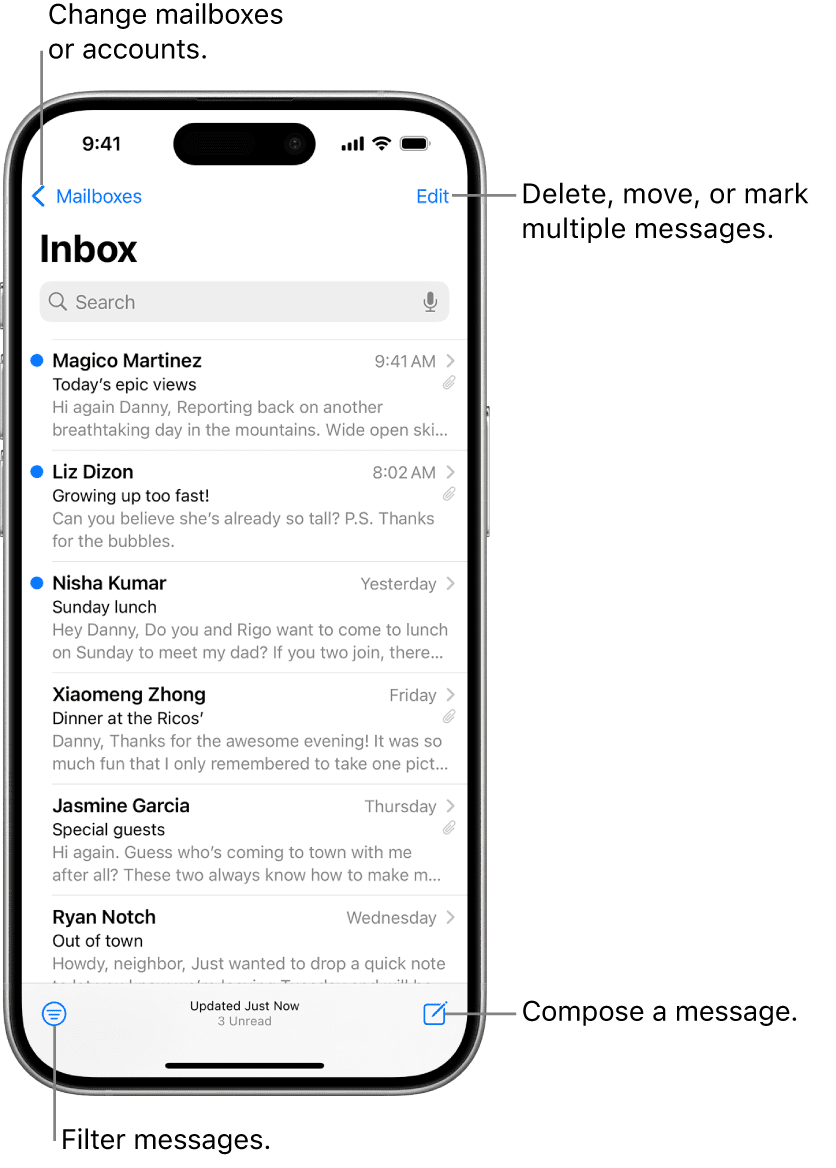
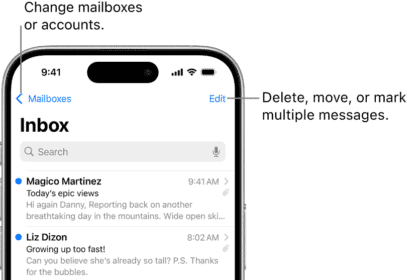
- On your iPhone, open the Mail app.
The Mailboxes screen appears. - Tap the mailbox you want to open.
The inbox for that account appears. - The Priority section can show Apple Intelligence summaries of your priority messages, when available in your region and language.
The Expand Thread icon on the right, a right-pointing arrow in a circle, indicates a thread. - Tap Expand Thread.
The thread expands to show all the messages in that conversation, and you can tap any message to read it.
Note: If Mail displays the contents of a mailbox, tap ‹ Mailboxes to return to the Mailboxes screen.


