


If you’re like many people, you use your iPhone camera often – but you haven’t explored all of the various modes and effects available. The different iPhone camera modes and lighting effects can help you take excellent photos. In this article, we will go over the camera modes and key features available in the Camera app on iPhone.
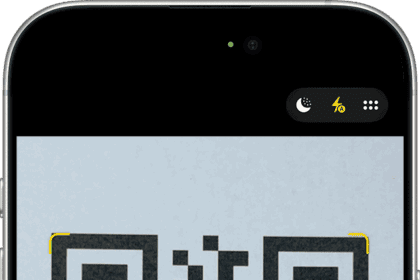
Note: In iOS 26, the Camera app was redesigned. You will only see Photo and Video at the bottom of the screen. However, you can still swipe left and right to access all other modes — they are just hidden by default. Swiping right from Photo reveals Portrait, Spatial, and Pano. Tap on Photo or the six-dot icon at the top right to open a pop-up menu with settings like Flash, Live Photos, Timer, Exposure, Photographic Styles, and Aspect Ratio.
Photo Mode
When you just want to take a simple photo, you can use Photo mode. Photo mode is the standard mode – the one that is automatically enabled when you open your camera app. With Photo mode, you can take still photos and Live Photos.
Still Photos
To take a still photo, simply tap the shutter button or press either volume button.
Live Photos
Live Photos captures a moment with movement and sound — 1.5 seconds before and after you tap the shutter. Live Photos is turned on by default. You will know it’s on when you see the Live Photos button at the top of your Camera screen. Just tap the shutter button to take a Live Photo. You can turn Live Photos on or off from the pop-up menu.
QuickTake
You can use QuickTake to record a video from Photo mode without switching to Video mode. To do this, press and hold the shutter button for as long as you wish to keep recording. Releasing the shutter button ends the recording. If you want to keep recording without holding, slide your finger to the right toward the lock icon.
You can also press and hold one of the volume buttons to record a QuickTake video. Note: If you have enabled “Use Volume Up for Burst,” then use the Volume Down button for QuickTake.
Burst Photos
Burst mode takes a rapid sequence of photos so you can choose the best one. To take a burst, swipe the shutter button to the left. If you have enabled “Use Volume Up for Burst” in Settings > Camera, you can also press the Volume Up button to take a burst.
Aspect Ratio
You can change the aspect ratio of your photos:
- From Photo mode, tap the six-dot icon at the top right (or tap on Photo at the bottom) to open the pop-up menu.
- Tap the Aspect option.
- Choose from 1:1 (Square), 4:3 (default), or 16:9.
Photographic Styles
Photographic Styles let you set a consistent look for your photos, such as warmer or cooler tones, with adjustable tone and warmth. Unlike filters, Styles intelligently apply adjustments to different parts of the photo while preserving skin tones. Access Styles from the pop-up menu by tapping the Styles option. Available on iPhone 13 and later.
Portrait Mode
When you use Portrait mode, the subject stays in focus while the background becomes artistically blurred (bokeh effect). Portrait mode is available on iPhone 7 Plus and later. For iPhone X and later, you can also use Portrait mode with the front-facing (selfie) camera.
To use Portrait mode, swipe right from Photo mode in the Camera app. Follow any onscreen instructions about distance. The label (such as “Natural Light”) should turn yellow to indicate the subject is detected, then tap the shutter button to take the picture.
On iPhone 15 Pro and later, you can also capture portrait-quality photos in regular Photo mode — your iPhone automatically captures depth data when it detects a person, dog, or cat. You can apply the portrait effect later in the Photos app by tapping Edit.
Depth Control
You can adjust the level of background blur. Tap or swipe up in Portrait mode, then tap Aperture and drag the slider to adjust the depth-of-field effect. You can also adjust depth after taking the photo in the Photos app.
Lighting Effects
Lighting effects change the look of your portrait. Available on iPhone 8 Plus and later. You can apply these while shooting or after in the Photos app:
- Natural Light — No effect applied; the face is in sharp focus against a blurred background.
- Studio Light — The face is brightened.
- Contour Light — Dramatic shadows with highlights and lowlights.
- Stage Light — The face is spotlit against a deep black background.
- Stage Light Mono — Like Stage Light, but in black and white.
- High-Key Light Mono — A grayscale subject on a white background (iPhone XS and later).
Night Mode
Night mode automatically brightens photos and captures more detail in low-light environments. Available on iPhone 11 and later. You do not need to do anything to turn it on — it activates automatically when the camera detects low light. The Night mode icon at the top of the screen turns yellow when active.
- Depending on how dark the scene is, your iPhone may take the photo quickly or require several seconds of exposure.
- For the best results, hold your iPhone as still as possible. Try placing it on a stable surface or use a tripod.
- If crosshairs appear in the frame, align them to reduce motion blur.
- You can manually adjust the exposure time by tapping the Night mode icon and dragging the slider.
- To turn Night mode off, tap the Night mode icon and slide the timer to Off.
Night mode also works with selfies (on supported models) and with Portrait mode on iPhone 12 Pro and later (using the wide lens).
Macro
Macro mode lets you take ultra-close-up photos with sharp focus on subjects just 2 centimeters away. Available on iPhone 13 Pro and later (models with the Ultra Wide camera).
Macro mode activates automatically when you move your iPhone close to a subject. The camera switches to the Ultra Wide lens to capture fine detail. A flower icon appears at the bottom-left of the screen when Macro is active. If you prefer to control when Macro activates, go to Settings > Camera and turn on Macro Control — a button will then appear in the Camera app to let you toggle Macro on or off manually.
Pano (Panoramic)
Pano mode lets you take a wide panoramic photo by slowly panning your iPhone across a scene. To use Pano, swipe right past Portrait and Spatial to reach Pano.
- Tap the shutter button, then slowly move your iPhone in the direction of the arrow.
- Use the guide bar in the middle of your view to help you keep your iPhone aimed correctly. Keep the arrow on the bar, and watch for “slow down” messages.
- If you want to move from right-to-left, tap on the arrow to change its direction.
- Either continue moving your iPhone until the full panorama image is captured, or tap the shutter button again to stop.
You can also take a vertical panorama by rotating your iPhone to landscape orientation.
Spatial
Spatial mode lets you capture spatial photos that can be viewed in 3D on Apple Vision Pro. Available on iPhone 15 Pro and later. Spatial mode requires your iPhone to be held in landscape orientation.
See also: Why The iPhone Has Three Cameras


