Occasionally, iPhone 18 Pro users have had problems with their touchscreens becoming unresponsive. In this article, we give general troubleshooting tips for users experiencing problems with unresponsive touchscreens.
We will give some general troubleshooting suggestions that iPhone users can follow to try and get their touchscreen issues solved.
General Troubleshooting Tips
If your screen is unresponsive, you can follow these tips to try and get it working again.
Force Restart
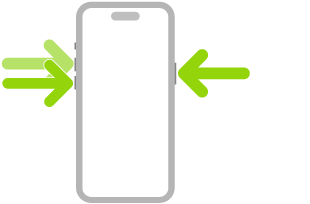
Press and quickly release the volume up button. Press and quickly release the volume down button. Press and hold the side button. When the Apple logo appears, release the side button.
Update iOS and Apps
If your iPhone 18 Pro is currently responding well enough, you should update iOS and your apps.
iOS Update
Go to Settings > General > Software Update and install any available updates.
App Updates
- Open the App Store.
- Tap your picture, tap App Updates and tap Update All to update all of your apps.
Note, that if your apps update automatically, you probably won’t have any apps with available updates.
Disconnect any USB-C Cable Accessories
Disconnect, then restart/force restart your iPhone 18 Pro.
Remove any Cases or Screen Protectors
Remove any cases or screen protectors you have on your device. See if your touchscreen responds without your case or screen protector covering the screen.
Reset All Settings
Try this if your screen is responding well enough. You should back up your phone before doing this (see the section Back Up your iPhone below for more.) Use your backup in case this solution does not work for you. It will save you the trouble of re-entering the settings that were wiped during this process. All settings—including network settings, the keyboard dictionary, location settings, privacy settings, and Apple Pay cards—are removed or reset to their defaults. Your data and media, however, will not be deleted.
Go to Settings > General > Transfer or Reset iPhone > Reset. Then select Reset All Settings. Enter your passcode and tap Reset to confirm.
Recovery Assistant
If you need to manually start Recovery Assistant:
- Connect your device to a computer or power source.
- Power the device off.
- Press and hold the side button until you see the connect to computer screen, then release the side button.
- Double press the side button.
- Click Continue.
- Review the information and choose to send or not send data to Apple.
The recovery process requires a Wi-Fi connection. After the recovery process completes, restart your device. If the startup issue continues, make sure your device is on the latest version of iOS. If your device is on the latest version of iOS, use recovery mode to restore your iPhone.
Recovery Mode Restore
- Connect your device to your computer with a USB cable.
- Open the Finder on your Mac, or open the Apple Devices app on your PC.
- Press and quickly release the Volume Up button. Press and quickly release the Volume Down button. Press and hold the side button until you see the “Connect to computer” screen.
- You should see a pop up window appear with options to Update or Restore. Choose Update. Leave your iPhone connected until the update has completed.
Arrange to have your iPhone 18 Pro Serviced
For this, you have three options:
- Use an Authorized Service Provider.
- Set up an appointment at an Apple Store.
- Contact Apple Support and arrange to send in your phone using Apple Repair Center.
Prepare your iPhone for Service
Before you have your phone serviced, you will want to backup your phone. You have a couple of options for backing up your phone.
Back Up your iPhone
- Back up using iCloud.
- Backup to your computer.
- Connect your iPhone to your computer via USB cable.
- Switch to the Finder on your Mac, or open the Apple Devices app on your PC. If your PC doesn’t have the Apple Devices app, or your Mac is using macOS Mojave or earlier, open iTunes instead.
- In Finder or iTunes, select your device, then click the General tab.
- Click Back Up Now.
Note: If your iPhone has other damage, such as a cracked screen, you may need to pay for this additional repair.