Some iPhone 18 Pro and iPhone 18 Pro Max users have said that they keep seeing an error message saying “Last line no longer available. Do you want to call using your remaining line?” A message saying “last used: (unavailable)” also appears under the contact name. This message appears when a user wants to make a call from the Recent call list or the Contacts app.
The error message includes two options: Call and Cancel. Some said that when they tap the Call option, they could successfully make the call.
I think that this issue is linked to the Dual SIM feature. Your iPhone 18 Pro supports Dual SIM using eSIM.
You may wonder why you are getting this error message. You may also wonder how you can fix it. In this article, I list several tips to address this problem.
Basic steps for the Last Line No Longer Available error
I recommend that you try these basic steps first. You should try these in this order. After trying each step, test to see if your issue is fixed:
- On your iPhone, turn on Airplane Mode and wait a few seconds and then turn it off. Open Control Center and tap the Airplane Mode button.
- Try clearing your call history. Some users have told me that this is how they fixed this issue. Open the Phone app and go to your list of calls — the Calls tab in the Unified layout, or Recents in the Classic layout. Apple’s steps for deleting calls are to tap Edit, tap Select, tap the calls you want to delete, then tap Delete. You can also swipe a single call all the way to the left to delete it.
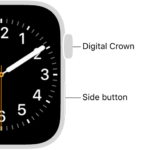
- Restart your iPhone and then try to place a call. Press and hold either volume button and the side button until the power-off slider appears. Drag the slider, then wait 30 seconds for your device to turn off. To turn your device back on, press and hold the side button (on the right side of your iPhone) until you see the Apple logo.
- Update your carrier settings, if there is an update. You can check for updates by going to Settings > General > About. When a carrier settings update is available, you’ll see a prompt to install it. If your carrier releases a mandatory update, you’ll see an OK button instead of an Update button to let you know that the system downloaded and installed the update. Follow the onscreen instructions to install your carrier update.
- Ensure that your iPhone has the newest version of the iOS software. You can check for updates by going to Settings > General > Software Update. Update may help you if a bug is causing this problem for you.
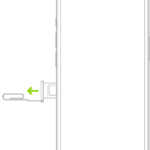
- If your iPhone has a physical nano-SIM card, remove the SIM card, put it back in. To pop open the SIM tray, insert a paper clip or a SIM-eject tool into the hole beside the tray. Push in, towards your iPhone, but don’t force it. Then insert the tray into the device completely and in the same orientation that you removed it. If your iPhone model doesn’t have a SIM tray, it supports eSIM only.
- When you call one of your contacts, you don’t need to choose which number to use every time. By default, your iPhone uses the same number that you used the last time you called that contact. If you haven’t called that contact, your iPhone uses your default number. You can also specify which number to use for your calls with a contact. Follow these steps:
- Tap the contact.
- Tap the word default.
- Tap the number you want to use with that contact.
To change which line your iPhone uses by default for all calls, go to Settings > Cellular, tap Default Voice Line, then choose a line.
Reset network settings to fix the Last Line No Longer error
Resetting your network settings may fix this problem. You should note that all of your network related settings and preferences will be erased. This includes:
- Your Wi-Fi preferences and settings such as your passwords.
- Cellular data roaming, which Apple notes may also be turned off.
- Your VPN configurations.
You should also note that this does not delete your content like your photos etc.
Go to Settings > General > Transfer or Reset iPhone > Reset and then tap Reset Network Settings. Follow the onscreen instructions to complete the reset process. Your iPhone 18 Pro will restart and then test to see if you see this error or not.
If you still see the error, this means that you should contact your carrier (Verizon, T-Mobile etc). You may also want to contact Apple. You can contact Apple using its live chat support option.