


- You cannot remove the middle of the video on your iPhone using the Photos application.
- Using iMovie, you can easily remove the middle part of the video on an iPhone like a professional.
Most times, when you record a video on your iPhone, you could get some speech errors or even get interrupted while recording. The standard way of handling this situation is to keep recording and trim off the unwanted parts afterward.
iPhone users are familiar with the Photos app, and some basic video editing can be done using the Photos app. In the Photos app, you can only trim the beginning and or the end parts of a video. It’s not possible to delete a middle part of a video on iPhone using the Photos app — you’ll need iMovie for that.
This step-by-step guide explains how to cut (trim) a section from the middle of your video on your iPhone using iMovie. Don’t worry if you’ve never used iMovie before; it’s easy to use.
How to cut out a middle part of your video on iPhone
Before you get started with the steps below, you need to install the latest version of iMovie from the App Store, since it doesn’t come pre-installed on iPhones. Once you’re done, simply follow the steps below to remove the middle of a video on your iPhone.
Step 1: Open the iMovie app on your iPhone.
Step 2: Tap on Movie, then select the video you want to trim from the Photos app.
Step 3: Tap Create Movie near the bottom of the screen. The video editor will open. You will see your video in the timeline.
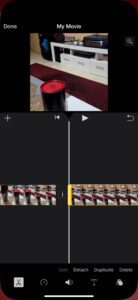
Step 4: Touch the video timeline and drag it to position the playhead from where you want to cut. the video.
Step 5: Tap the video timeline, and a toolbar will appear at the bottom of the screen. Tap on Split.
Step 6: Drag the video clip again and position the playhead where you want to end the cutting. Tap the video timeline to bring up the toolbar, then tap Split option again.
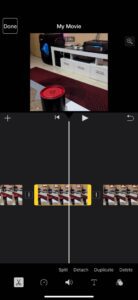
Step 7: Now you should have a middle portion that is separated from the whole video. If it isn’t highlighted in yellow, tap to ensure that it is highlighted.
Step 8: Tap Delete, and the highlighted middle section will disappear. This means you have successfully deleted the middle part of the video.
Step 9: Now, if you wish to add a transition effect between the two parts of the video, tap on the little square with a vertical bar that appear between the two video pieces. Choose one of the effects from the toolbar at the bottom. To preview the effect, position the scrubber (play position) before the transition by moving the video timeline to the right and then hitting the Play button.
Step 10: Tap Done in the upper left corner of the screen.
Step 11: Tap on My Movie to change the name of your video if you like. Tap Done.
How to share the trimmed video from iMovie

You can share the trimmed video from the iMovie app.
Step 1: If you are in the Projects view, tap on the video.
Step 2: Tap the Share button at the bottom of the screen.
Step 3: Tap the Save or Share Video button. There are a few things you can do from here:
- You can change the resolution of the video you share by tapping on Options underneath the video name near the top of the Share menu.
- You can share the video with someone by choosing a contact or an app.
- If you scroll down, you will see other options. Among them is Save Video. This will save the video to the Photos app.
Although you can use the iMovie app to trim the middle of a video on your iPhone, doing so may actually make the video file larger. Certainly, if you cut out a large chunk from the middle of the video, the file size can get smaller. When I tried this with my own video, I only removed a couple of seconds from my video. After saving my iMovie edited video to Photos, it was about a 50% larger file than the original (both saved in the HEVC format).


