


With AirDrop, you can quickly share stacks of photos, long videos, and even large files from your iPhone, iPad, or Mac to nearby Apple devices. You can use AirDrop to send files to your own devices or to share files with others.
Here’s how to turn on AirDrop and use it on your iPhone®, iPad®, iPod Touch®, and Mac®.
How to turn on AirDrop
To send an item to someone with AirDrop, both you and your recipient must have turned on AirDrop and chosen to accept items from either Contacts or Everyone. If a recipient chooses to only accept items from a contact, you must be in their contacts list and they need to have your Apple Account email address or phone number included in your contact card.
Here’s how to turn on the feature and customize AirDrop settings to change who’s allowed to AirDrop to you on iOS®, iPadOS®, and macOS®.
On an iPhone or iPad
You can turn on AirDrop in Settings or in the Control Center:
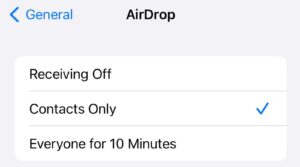
How to turn on AirDrop in Settings
- Open the Settings app, then tap General.
- Tap AirDrop, then choose either Contacts Only or Everyone for 10 Minutes.
How to turn on AirDrop in the Control Center
- Open the Control Center on your iPhone or iPad.
- Touch and hold the top-left group of controls, then tap the AirDrop icon.
- Tap Contacts Only or Everyone for 10 Minutes to choose who you want to receive items from.
Note: The Contacts Only and Everyone for 10 Minutes options are not available to all devices.
When you set your AirDrop option to Everyone for 10 Minutes in iOS 16.2 or later, your option reverts to Contacts Only after 10 minutes.
On a Mac
- Click the Control Center status menu in the menu bar, then click the AirDrop icon. When it’s blue, it’s on.
- To choose who can send items to you, click the right arrow next to AirDrop, then click Contacts Only or Everyone.
How to use AirDrop on iPhone or iPad
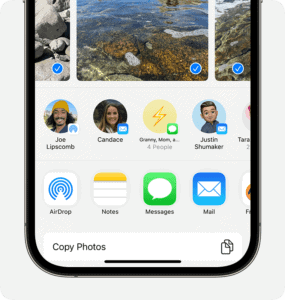
- Open the item, then tap the Share icon, Share, the AirDrop icon, or another button (depending on the app).
- Tap the AirDrop icon, then tap the recipient you want to share with.
- The recipient will be able to accept or decline the transfer.

Note: The recipients you see are those who are nearby, have Wi-Fi and Bluetooth turned on, and are able to accept files from your device.
If you leave AirDrop range, content you share will continue to send securely and in full quality over the Internet, so long as both you and the recipient are signed into iCloud.
Tip: If you’re within close range of someone in your contacts, you can initiate an AirDrop transfer by opening the file you want to share, then moving your iPhone close to your contact’s iPhone (on supported models with iOS 17 or later).
How to receive files on AirDrop on your iPhone or iPad
When someone shares something with you using AirDrop, you see an alert. You can tap Accept or Decline.
For most apps, if you tap Accept, the AirDrop will come through within the same app it was sent from. For example:
- Photos: Appear in the Photos app.
- Websites: Open in Safari.
- App links: Open in the App Store so you can download or purchase the app.
Note: Some items may be saved in the Files app instead of the app they were sent from.
If you AirDrop something to yourself, like a photo from your iPhone to your iPad, you won’t see an option to Accept or Decline—it’ll automatically get sent to your device. Just make sure that both devices are signed in with the same Apple account.
How to AirDrop from an iPhone to a Mac
- On your iPhone, open the item, then tap the Share button, Share, the AirDrop icon, the More ellipsis button, or another button (depending on the app). Tap The AirDrop icon, then tap the Mac you want to AirDrop to.
- On a Mac, click Accept on the AirDrop notification.
Tip: If you’re signed in to iCloud using the same Apple Account for iCloud on both devices, the item is automatically accepted and saved on your Mac.
How to use AirDrop on a Mac
- Open the item on a Mac, click the Share icon in the toolbar, then click AirDrop.
- Select the recipient you want to share with. The recipients you see are those who are nearby, have Wi-Fi and Bluetooth turned on, and are able to accept files from your device.
Tip: You can also share items with AirDrop in the Finder. Go to the Finder, click AirDrop in the sidebar, then drag the item you want to share to the recipient you want to send it to.
How to receive files on AirDrop on Mac
On your Mac, click Accept on the AirDrop notification.
Most items are saved in the app that they’re sent from. For example, if you use AirDrop to send a photo from the Photos app on your iPhone, it’s saved in the Photos app on your Mac.
Tip: Some items are automatically saved in the Downloads folder on your Mac. You may also have the option to choose where to save items.
Note: If you opened AirDrop in the Finder on a Mac, the notification to accept or decline appears here, rather than in Notification Center.
If you send items from one of your Apple devices to another (for example, from your iPhone to your Mac), and you’re signed in to iCloud using the same Apple Account on both devices, the item is automatically accepted and saved.
How to AirDrop from Mac to iPhone
- On your Mac, open the item, click the Share button in the toolbar, then click AirDrop. Select the iPhone you want to AirDrop to.
- On your iPhone, tap Accept on the AirDrop notification.
Tip: You can also share items with AirDrop in the Finder. To open a Finder window, click the Finder icon in the dock. Click AirDrop in the sidebar, then drag the item you want to share to the recipient you want to send it to.
Note: If you’re signed in to iCloud using the same Apple Account for iCloud on both devices, the item is automatically accepted and saved on your iPhone.
If AirDrop isn’t working
- Make sure that you’re both using an iPhone, iPad, or Mac.
- Make sure that both the sender and recipient have Wi-Fi and Bluetooth® turned on.
- Make sure that the devices are within 30 feet (10 meters) of each other.
- If either of you have personal hotspot on, turn it off.
- Check if the person you’re sending to has their AirDrop set to receive from Contacts Only. If they do, and you’re in their Contacts, they need to have your Apple account’s email address or mobile number in your contact card for AirDrop to work. If you’re not in their Contacts, have them set their AirDrop receiving setting to Everyone in order to receive the file.
- Make sure that the recipient device is unlocked using Face ID, Touch ID, or Passcode.
- Make sure that your devices have the latest operating system version.
- If you’re having difficulty getting AirDrop to work, restart your device and try again.
- If you’re using a VPN, disable it and try again.
- For further help, see our article on how to fix AirDrop problems.


