


Summary
- You can enable iMessage on your iPhone or iPad by going to Settings > Apps > Messages.
- You can back up your iMessage conversations to the cloud in your Apple Account settings.
- You can set up iMessage on your Mac by logging into your Apple Account in the Messages app.

Do you want to know how to enable iMessage on your iPhone, iPad, or Mac? If you have an Apple Account, you can use iMessage—a secure messaging service—to send unlimited messages to anyone using iMessage on their iPhone, iPad or Mac. Messages sent using iMessage appear in blue text bubbles. In this article, I’ll explain how to set up iMessage on iPhone, iPad and Mac.
What Is iMessage & Why Should You Use It
iMessage is a secure messaging service that you can use to send and receive text messages in the Messages app on your iPhone, iPad, Mac, Apple Watch, and Apple Vision Pro.
If someone sends a message to your email address or phone number using iMessage, you receive the message on all your Apple devices that are set up to receive messages sent to that email address or phone number. When you view an iMessage conversation, you see all messages sent from any device, so you can keep in touch with others wherever you are. When you communicate with others who also use iMessage on an Apple device, the texts appear in blue bubbles. (SMS, MMS, and RCS messages appear in green bubbles.)
iMessage is the best way to communicate with other Apple users for a couple of reasons:
- You can send texts over Wi-Fi or cellular service.
- Texts you send and receive using iMessage don’t count against your SMS, MMS, or RCS allowances in your cellular messaging plan, but cellular data rates may apply.
- In a conversation, you can see if someone’s writing a message. If someone has read receipts turned on, you can also see if they’ve opened your message.
- You can use a wider range of apps and features, like text formatting, inline replies, editing, unsending, scheduling, backgrounds, polls, Memoji, drawings, collaboration, group conversation management, and more.
How to Turn On iMessage on iPhone
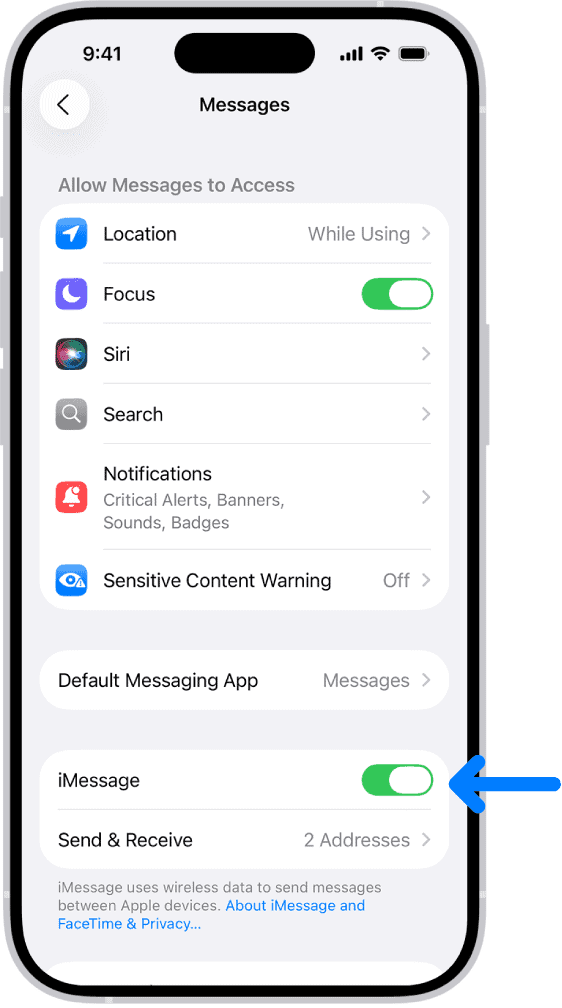
You can enable iMessage right from the Settings app on your iPhone or iPad. Follow these steps:
- Open the Settings app on your iPhone.
- Scroll down and tap Apps.
- Tap Messages.
- Turn on iMessage.
- To select which of your phone numbers and email addresses you want to use with iMessage, tap Send & Receive, then choose from the available options below “You can receive iMessages to and reply from.
 ”
”
That’s how to enable iMessage on iPhone. You’re ready to begin sending iMessages to other friends on their iPhone, iPad, or Mac. You’ll know you’ve successfully sent an iMessage if your outgoing message is blue. If you want to know how to check iMessage settings, you can find them by following the above steps.
Enable Messages in iCloud on iPhone
When you turn on Messages in iCloud, messages you send and receive on your iPhone are saved in iCloud. When you sign in to the same Apple Account and turn on Messages in iCloud on another device, your conversations show up and sync there too. Your entire messages history is kept up to date across those devices, even when you set up a new device. This includes messages sent or received with SMS, MMS, RCS, or iMessage. Here’s how to enable iMessage in iCloud on iPhone:
- Make sure that your iPhone is turned on and connected to a Wi-Fi or cellular network, and that you sign in to the same Apple Account on each device.
- Open the Settings app on your iPhone.
- Tap your name, tap iCloud, then tap Messages.
- If Messages doesn’t appear, tap See All in the Saved to iCloud section.
- Turn on “Use on this iPhone” (if it’s not already turned on).
After you turn on Messages in iCloud on your iPhone, any messages or attachments you delete from iPhone are also deleted from your other Apple devices
How to Turn On iMessage on a Mac
Last but not least, how do you enable iMessage on the Mac? You can get your iPhone messages on your Mac, thanks to iMessage. Here’s how:
- Open the Messages app on your Mac.
- Enter your Apple Account email address or phone number, then click Sign In. Make sure to sign in to the same Apple Account on every device.
- Enter your Apple Account password, then click Sign In.
- Go to Messages > Settings, click iMessage, then do any of the following:
- Choose your email addresses or phone numbers for sending and receiving messages: Select options below “You can be reached for messages at” for incoming messages, then, if you selected more than one option, click the pop-up menu below “Start new conversations from” to specify which email address or phone number to use for new, outgoing messages.
- Let senders know when you read their messages: Select “Send read receipts.”
Once you have iMessage set up on your Mac, there are several ways you can customize it to get the most of our iMessages on your Mac.
Enable Messages in iCloud on Mac
- Open the Messages on your Mac.
- Go to Messages > Settings, click iMessage, then select Enable Messages in iCloud.
How to Turn Off iMessage on a Mac
If you need to disable iMessages on your Mac for any reason, simply sign out of iMessage. Here’s how:
- Open the Messages app on your Mac.
- Go to Messages > Settings, then click iMessage.
- Click Sign Out, then confirm that you want to sign out. When you sign out of iMessage, you no longer receive messages on your Mac.


